The secret to a convincing cold-cast bronze isn’t just mixing powder and resin; it’s about tricking the senses by manipulating particle density, chemical reactions, and internal weight.
- A high powder-to-resin ratio (over 50% by weight) is non-negotiable for creating a polishable metal surface.
- Authentic aging is achieved not with paint, but with controlled chemical reactions (patinas) that mimic natural oxidation.
- The illusion of weight is created by strategically backfilling the hollow cast with dense materials like sand or steel shot.
Recommendation: Prioritize creating a dense, metal-rich surface layer first. The weight and patina can be added later, but an authentic metallic sheen cannot be faked after casting.
Every sculptor who has picked up a “cold-cast” piece knows the familiar disappointment. It might have the glint of bronze, but it feels light, hollow, and plasticky. The common advice is a simplistic recipe: mix some bronze powder into resin, pour it into a mold, and you’re done. This approach often leads to sculptures that look more like a metallic-painted toy than a weighty, timeless artwork. You end up with a piece that has the look but lacks the soul of metal, failing to capture the gravitas and tactile satisfaction of a true bronze sculpture.
The frustration stems from treating cold casting as a simple mix-and-pour process. The internet is filled with tutorials that gloss over the critical details that trick the eye, the hand, and even the ear. They talk about polishing but not about the microscopic “smearing” of metal particles that creates the lustre. They mention aging but not the controlled chemical warfare you must wage on the surface to create a genuine patina. This leaves artists with results that are close, but ultimately unconvincing, missing the crucial elements that bridge the gap between a resin casting and a metal object.
But what if the real secret wasn’t in the resin, but in the physics and chemistry you apply to it? The key to making resin look and feel like solid metal is to stop thinking of it as a plastic imitation and start treating it as a composite material you can manipulate. It’s about creating a dense metallic skin that behaves like real metal, forcing it to age through chemical processes, and giving it the deceptive heft of a solid-cast object. This is where the ingenuity of special effects artistry comes into play—using clever, targeted techniques to build the illusion from the inside out.
This guide will deconstruct the process, moving beyond the basic recipe. We will explore the science behind powder ratios, the alchemical art of patination, the engineering of internal weighting, and the common errors that betray your sculpture’s plastic origins. Get ready to learn the tricks that turn a simple resin cast into a piece with the authentic presence of solid bronze.
This article breaks down the essential techniques that separate amateur attempts from professional-grade results. The following sections provide a detailed roadmap for mastering every aspect of the cold-casting illusion.
Summary: A Sculptor’s Guide to Authentic Cold-Cast Bronze
- Why You Need More Bronze Powder Than Resin to Polish to a Shine?
- How to Use Acids to Age Resin-Bronze Just Like Real Metal?
- Resin Composite or Molten Metal: Why is Real Bronze 10x More Expensive?
- The Sealing Error: Why Your Bronze Sculpture is Staining the Shelf Green?
- How to Backfill Your Sculpture with Sand to Mimic the Heaviness of Metal?
- Organic Clay Brushes or Geometric Extrusion: Which Method is Faster for Heads?
- The Hole in the Mesh: Why Your 3D Printer Rejects Your Polygon Model?
- Heavy Impasto Relief: How to Transport and Maintain 3D Paintings Without Cracking?
Why You Need More Bronze Powder Than Resin to Polish to a Shine?
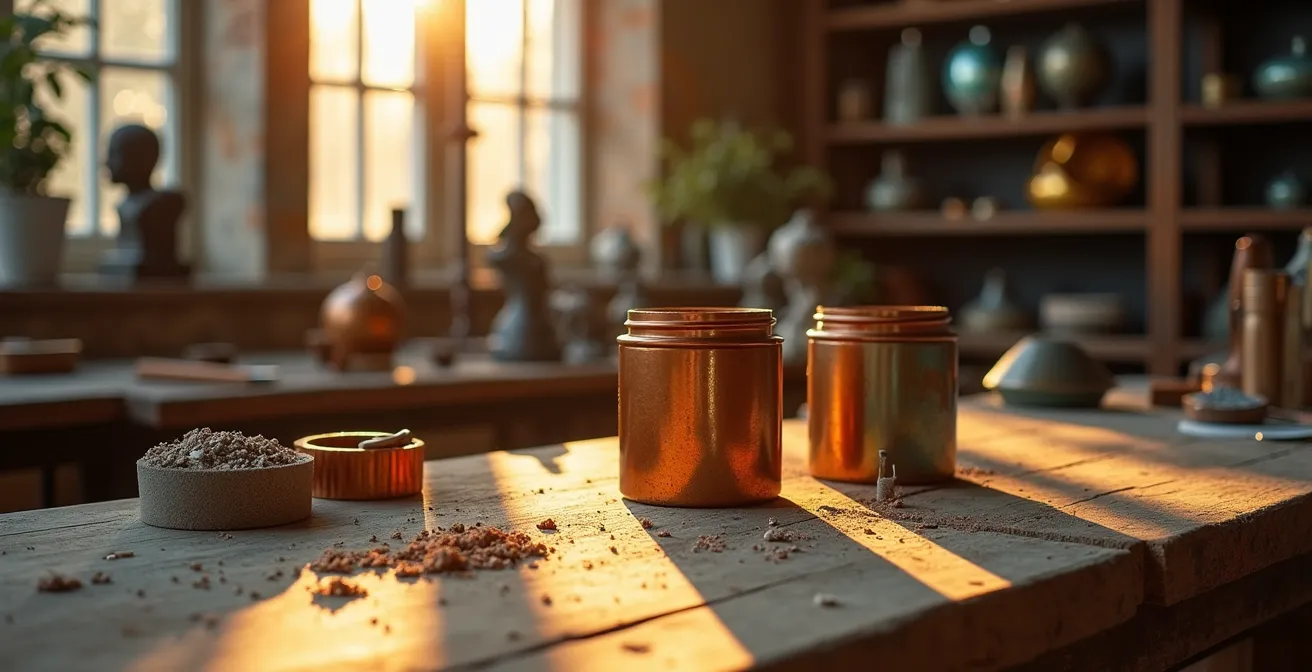
The most common failure in cold casting is a surface that refuses to polish to a metallic sheen, remaining dull and plasticky. The reason isn’t the quality of your polish but the fundamental physics of your mix. To achieve a true metal finish, the bronze particles must be packed so densely that they form a continuous network. When you polish, you’re not shining the resin; you are burnishing and smearing the topmost layer of these metal particles into a solid, light-reflecting skin. If the particles are too far apart, suspended in a sea of resin, your steel wool will simply scratch the plastic, never achieving a metallic lustre.
The industry standard, and the absolute key to success, is ensuring your mix contains a minimum of 50% bronze powder by weight. Many professionals push this to a 1:1 or even a 2:1 powder-to-resin ratio. At this density, the cured material is less “resin with metal flakes” and more of a “metal matrix” held together by a resin binder. This high concentration is what allows the surface to be abraded away, exposing a layer so rich in metal that it behaves like a solid sheet of bronze. The particle size also matters: a finer powder (like 325 mesh) allows for a smoother, mirror-like polish, while a coarser powder (200 mesh) will yield a more textured, antique finish.
Achieving this perfect surface requires a methodical approach, not just a haphazard mix. It’s a process of controlling variables to ensure the metal is where you need it most—on the surface. The following checklist outlines the critical steps from mixing to final polish to guarantee your cast has a genuine metallic skin ready for burnishing and patination.
Action Plan: Achieving the Perfect Bronze Polish
- Ratio Check: Weigh your components. Ensure the bronze powder is at least 50% of the total mix weight to create a dense metallic network.
- Particle Size Selection: Inventory your powders. Choose a 325 mesh for a high-gloss, mirror finish or a 200 mesh for a more textured, ancient look.
- Even Distribution: Confront air bubbles. After pouring, vibrate the mold gently to release trapped air and help the heavy bronze powder settle against the surface detail.
- Cure Time Verification: Check the resin’s technical data sheet. Allow the full cure time (often 15-30 minutes for fast-cast types) before demolding to prevent a soft, unpolishable surface.
- Burnishing a Test Patch: Before polishing the whole piece, use #0000 steel wool on a small, hidden area. Confirm that you can expose and smear the metal particles into a continuous shine.
Without this critical mass of metal, no amount of elbow grease will save the piece from its plastic nature. It is this foundational step that dictates whether you are creating a true composite metal or simply a sparkly piece of resin.
How to Use Acids to Age Resin-Bronze Just Like Real Metal?
A polished bronze finish is only the beginning. The true character of bronze comes from its patina—the rich blues, greens, and dark browns that develop over time. Faking this with paint is a common amateur mistake that results in a flat, lifeless surface. The secret to an authentic-looking patina on cold-cast bronze is to use the same chemical reactions that age real bronze. Because your sculpture’s surface is a dense layer of actual metal particles, you can force it to oxidize using common acids and compounds.
The technique involves creating a “fuming chamber,” a sealed environment where chemical vapors can react with the bronze surface. For a classic blue-green verdigris patina, an ammonia-based solution is highly effective. The process is surprisingly simple: place your polished bronze piece inside a sealed plastic container, elevated on a stand. In a separate small dish at the bottom of the container (not touching the piece), pour a solution of vinegar and salt. As the vinegar and salt release acetic acid fumes, they react with the copper in the bronze powder, accelerating the oxidation process that would naturally take years. The result, after 12 to 24 hours, is a genuine, crystalline patina that grows right on the metallic surface, with a depth and variation that paint can never replicate.
This is where the artist becomes an alchemist, manipulating chemicals to paint with time itself. The resulting patina isn’t just a layer of color; it’s a true chemical transformation of the surface, creating an object that feels genuinely old and storied.
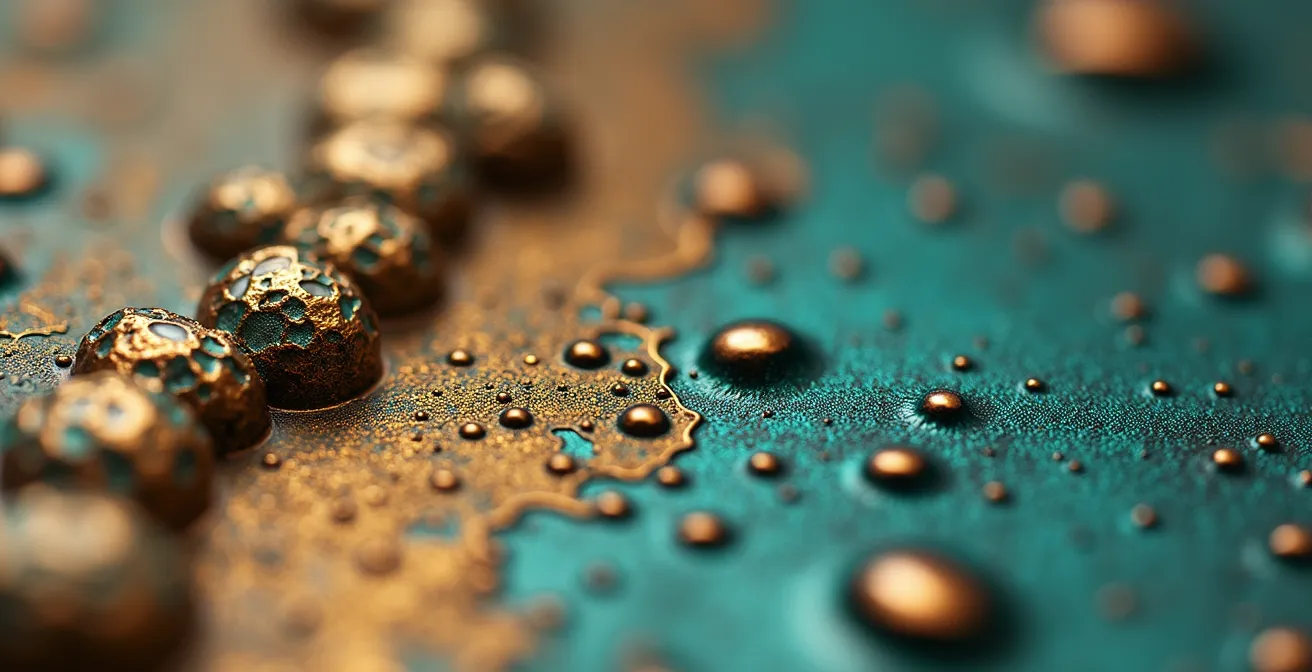
As the illustration reveals, this process creates intricate crystalline structures on the metal particles. It’s a micro-level corrosion that adds unparalleled realism. However, working with these chemicals requires a healthy respect for safety. You are handling corrosive materials, and proper precautions are non-negotiable. The following table outlines the essential safety gear and procedures for different types of patination chemicals.
Handling these chemicals demands caution. As an analysis of corrosive material management from hazardous waste experts highlights, proper personal protective equipment (PPE) and ventilation are not optional, but essential for safe artistic practice.
| Chemical Type | PPE Required | Ventilation Needs | Disposal Method |
|---|---|---|---|
| Ammonia-based | Gloves, goggles, respirator | Outdoor or fume hood | Neutralize with vinegar before disposal |
| Acid-based (vinegar) | Gloves, eye protection | Well-ventilated area | Neutralize with baking soda |
| Liver of Sulfur | Full PPE, chemical apron | Fume extractor required | Special hazardous waste handling |
Resin Composite or Molten Metal: Why is Real Bronze 10x More Expensive?
While cold casting offers an incredible simulation of bronze, it’s important to understand why it’s a simulation and not a replacement. The immense cost difference between a cold-cast piece and a foundry-cast (or “hot cast”) bronze is rooted in labor, materials, and a process that has remained largely unchanged for millennia. Hot casting is a multi-stage ordeal involving creating a wax positive, building a ceramic shell around it, melting out the wax (the “lost-wax” method), pouring molten bronze at over 1000°C, and then painstakingly breaking the shell and chasing the metal surface. It is a process that requires a specialized foundry, immense energy consumption, and highly skilled artisans.
In stark contrast, cold casting is a room-temperature process that can be done in any studio. The materials—polyurethane resin and metal powder—are a fraction of the cost of bronze ingots. More importantly, the speed is dramatically different. A process that takes weeks at a foundry can be accomplished in a day with cold casting. In fact, the cold casting process is often 10 to 15 times faster than the traditional lost-wax method, which is a major factor in its affordability for artists and prop makers.
The result of the hot-casting process is an object of incredible permanence. As Robert James Workshop explains, a hot-cast bronze sculpture is a hollow metal object born from fire. The process starts with a wax replica, which is encased in a ceramic shell. The wax is then melted out, leaving a void into which molten bronze is poured. Once cooled, the ceramic is shattered, revealing the raw metal piece which is then cleaned, chased, and patinated. These sculptures can endure for thousands of years, outdoors or in, making them a true archival medium.
Cold-cast pieces, while durable, are fundamentally a plastic composite with a metal skin. They are susceptible to UV degradation over long periods and do not possess the same structural integrity or archival longevity as a solid metal object. Understanding this distinction is key: you are choosing a brilliant and effective illusion, trading millennial permanence for accessibility and speed.
The Sealing Error: Why Your Bronze Sculpture is Staining the Shelf Green?
You’ve created a beautiful patina, but a few weeks later you notice a faint green ring on the shelf beneath your sculpture. This is a classic sign of an unsealed or improperly sealed cold-cast piece. The verdigris patina you so carefully created is a form of active corrosion. If left unsealed, moisture in the air can continue to react with the copper particles, causing the patina to “leach” or rub off onto any surface it touches. This is the same reason ancient bronze statues leave green stains on their stone pedestals.
Sealing the sculpture is a critical final step that locks in the patina and protects the surface. However, the choice of sealant is a delicate balance between protection and aesthetics. A thick, glossy polyurethane might offer maximum durability, but it can also create a “plasticky” sheen that completely shatters the illusion of real metal. The goal is to protect the piece without screaming “I’m covered in plastic!”
As the experts at Robert James Workshop note, the choice of sealant directly impacts the final look and longevity of the finish. They highlight a key aspect of unsealed pieces: “The surface colour of the sculpture will change however and eventually turn a verdigris colour due to the high copper content of the piece.” This “living finish” can be desirable for outdoor pieces, but for indoor art, a sealant is necessary to stabilize the look and prevent staining.
Choosing the right sealant depends entirely on the desired finish and the sculpture’s environment. A comparison of common options reveals the trade-offs an artist must make.
This comparative table, based on guidance for finishing bronze, demonstrates the critical choice between finish and durability. For instance, according to the technical guide from Robert James Workshop, carnauba wax offers a natural finish but requires periodic reapplication, whereas a spray lacquer provides more durability at the risk of yellowing over time.
| Sealant Type | Finish | Durability | Best Use | Drawbacks |
|---|---|---|---|---|
| Carnauba Wax | Satin, natural | 6-12 months | Indoor sculptures | Requires reapplication |
| Spray Lacquer | Matte/Gloss options | 2-3 years | General protection | Can yellow over time |
| Polyurethane | High gloss | 5+ years | Maximum durability | Creates plasticky appearance |
| No Sealant | Living finish | Ongoing patina | Outdoor pieces | Will oxidize and change |
How to Backfill Your Sculpture with Sand to Mimic the Heaviness of Metal?
You’ve perfected the look, but the illusion shatters the moment someone picks up your sculpture. It’s light, confirming its plastic core. The final piece of the puzzle in creating a convincing bronze replica is weight. A hollow resin shell will never feel like solid metal. The ingenious trick is to “backfill” the hollow cast with a dense, inexpensive material to give it the surprising heft of real bronze.
The technique involves casting a thin (3-4mm) but strong outer layer of the bronze-resin mix—this is your “gel coat.” Once this skin has partially cured but is still tacky, you can fill the remaining void with a variety of materials. The simplest and most effective filler is a mix of sand or gravel with a small amount of resin to bind it together, creating a solid, rock-like core. For maximum density in smaller pieces, a mixture of steel shot and resin can be used. This not only adds significant weight but also improves the sculpture’s structural integrity.
This technique even affects the piece’s acoustics. A hollow cast ‘clinks’ like ceramic, a dead giveaway. However, the filler material can be used to mimic the sound of real metal. As noted in a deep-dive on resin casting techniques, different fillers produce distinct sounds: sand creates a dull thud, plaster offers some resonance, but metal shot suspended in resin comes closest to replicating the characteristic “ring” of solid bronze when tapped. It’s a subtle detail, but one that completes the sensory illusion.
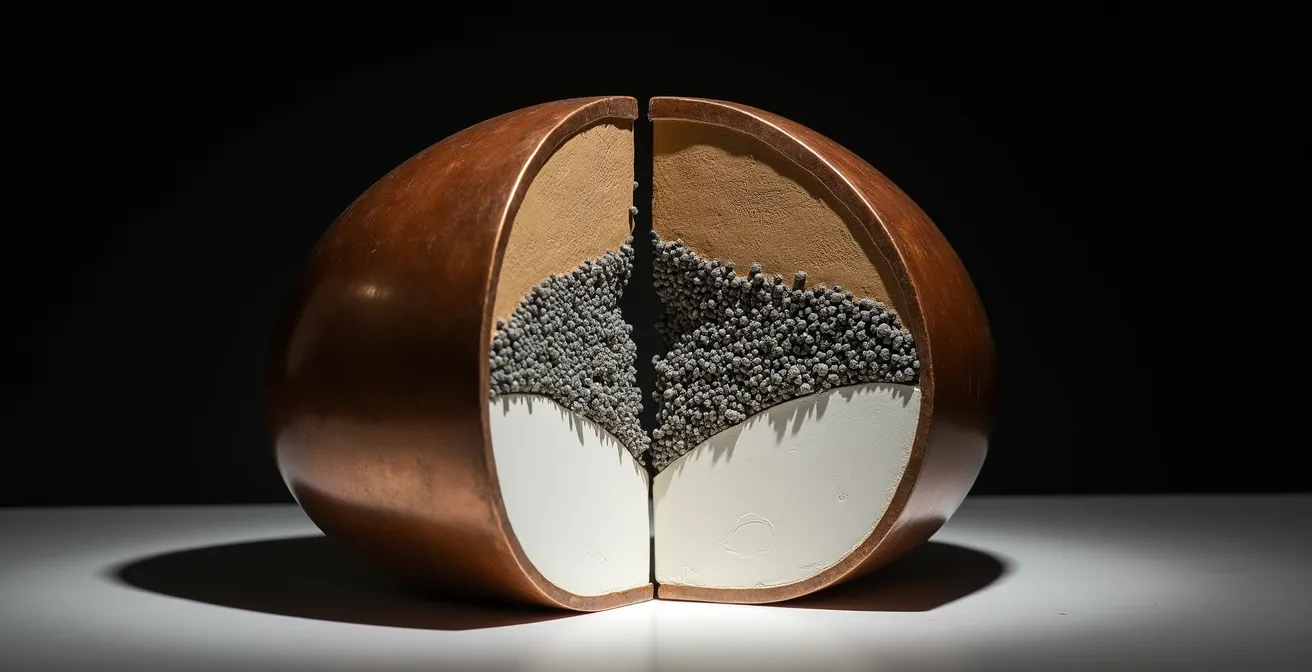
As this cross-section shows, the sculpture becomes a complex composite object. It features a beautiful metallic outer skin, backed by a dense, heavy core. This internal structural ballast is invisible to the eye but is fundamental to the tactile experience of the piece. You’re not just filling a void; you are engineering the sensation of density, completing the final, crucial step in fooling the senses.
Organic Clay Brushes or Geometric Extrusion: Which Method is Faster for Heads?
The quality of your final cold-cast bronze is often determined before you even open a can of resin. For artists working digitally, the very tools used in sculpting software like ZBrush or Blender have a profound impact on the physical outcome. The choice between using “organic” brushes that mimic clay tools and “geometric” methods like extrusion isn’t just an aesthetic one—it’s a practical decision that dictates how your patina will look and how easily the surface will polish.
For sculpting a head, a hybrid approach is often fastest and most effective. Use organic brushes (like Clay Buildup or Trim Dynamic) for broad areas like cheeks, foreheads, and necks. These brushes create subtle, micro-textured surfaces that are perfect for capturing patina. The tiny peaks and valleys give the chemical solution more surface area to cling to, resulting in a richer, more varied coloration. A perfectly smooth, geometric surface can cause patina to bead up or run off, leading to a splotchy, uneven finish.
Conversely, for areas intended to have a high-gloss polish—like the edge of a helmet, a piece of jewelry, or futuristic armor—geometric extrusion and hard-surface modeling techniques are superior. These methods create perfectly clean, smooth planes that are ideal for burnishing to a mirror shine. The contrast between a deeply patinated, organic texture and a brilliantly polished geometric element creates a powerful visual dynamic that makes the entire piece more believable. Planning these textures at the digital stage saves countless hours of difficult surface work on the physical cast.
By thinking ahead, you can embed “tool marks” digitally, such as using a digital rake brush to simulate the drag marks of a traditional sculpting tool. This adds another layer of authenticity, suggesting the piece was shaped by hand, not printed by a machine. The key is to design with the final physical properties in mind, using digital tools to pre-determine which areas will catch the light and which will hold the darkness of a patina.
The Hole in the Mesh: Why Your 3D Printer Rejects Your Polygon Model?
There’s nothing more frustrating than sending a finished 3D model to print, only to have it rejected for being “non-manifold” or “not watertight.” For an artist, these terms can be baffling. A model that looks perfectly solid on screen can be riddled with tiny holes, internal faces, or inverted normals that make it unprintable. When creating a master model for a mold, the technical requirements become even stricter. Your model doesn’t just need to be printable; it needs to be “cast-ready.”
A “watertight” model is the minimum requirement for 3D printing—it means there are no holes in the mesh. However, a “cast-ready” model goes several steps further. The most critical consideration is hollowing and wall thickness. For cold casting, you need a uniform wall thickness of 3-4mm. This ensures the resin gel coat distributes evenly, preventing weak spots or areas so thick they generate excess heat and warp. Any internal geometry must be completely removed, as it can trap resin and create a solid, heavy block instead of a hollow shell.
Furthermore, you must strategically add holes back into your perfectly sealed model. Vent holes must be placed at the highest points of the model (relative to its orientation during casting) to allow air to escape as the resin is poured in. Without them, you’ll get air traps that result in ugly voids on the surface of your bronze cast. A larger fill hole must be positioned to allow for easy, gravity-assisted pouring. This technical preparation is the unglamorous but essential foundation for a successful cast.
The distinction between a model that simply looks good and one that is technically sound for production is crucial. The following table breaks down the key differences.
| Model Aspect | Watertight Only | Cast-Ready |
|---|---|---|
| Mesh Integrity | No holes or gaps | No holes + verified manifold edges |
| Internal Geometry | Can have hidden geometry | All internal geometry removed |
| Wall Thickness | Variable acceptable | Uniform 3-4mm required |
| Venting | Not required | Strategic vent holes essential |
| Surface Normals | Basic orientation | All normals facing outward |
Ultimately, a model that is not properly prepared for casting will fail, wasting time, resin, and powder. Mastering this digital prep work is as important as mastering the physical casting itself.
Key takeaways
- The illusion of real metal relies on three pillars: a high-density metallic surface for polishing, controlled chemical aging for patina, and internal ballast for weight.
- A powder-to-resin ratio below 50% by weight will almost always result in a plastic-looking finish that cannot be properly burnished.
- Sealing your final piece is not optional if you want to prevent the patina from staining surfaces and to stabilize the finish.
Heavy Impasto Relief: How to Transport and Maintain 3D Paintings Without Cracking?
The cold-casting technique isn’t limited to three-dimensional sculptures. It can also be adapted to create stunning 3D paintings or heavy impasto reliefs. Artists can build up thick, sculptural layers of bronze-resin directly onto a canvas or board. However, this application presents a unique challenge: cracking. A standard, rigid epoxy or polyurethane resin is brittle. When applied to a flexible surface like a canvas, any bending or vibration during transport or handling will cause the thick bronze impasto to crack and potentially flake off.
The secret to creating durable, transportable 3D paintings with this method is to switch from a rigid casting resin to a flexible polyurethane plastic. Flexible resins are designed to withstand bending and torsion without breaking. By mixing bronze powder into a flexible resin (like Polytek’s EasyFlo 60, often used for pliable props), you create a “flexible bronze” composite. This material has the same polishable, patinable surface as a rigid cast, but it can move with the canvas, making the artwork far more resilient.
For existing fragile pieces, a retrofit reinforcement can be applied. This involves reinforcing the back of the canvas itself. The process typically includes layering fiberglass cloth onto the back of the artwork and saturating it with a resin mixture. Using a bronze-resin mix (with a lower powder ratio, around 30%, for better flexibility and adhesion) for this backing not only adds immense structural strength but also adds weight, contributing to the overall sense of a substantial, metallic object. This turns the entire painting, front and back, into a unified, durable composite.
This adaptation of the technique opens up new avenues for artists, allowing them to combine the painterly world with the sculptural, creating works with real texture, weight, and metallic depth that can still be hung on a wall and transported safely.
By understanding and applying these advanced techniques—from material ratios to chemical aging and structural engineering—you can elevate your work from a simple resin copy to a sophisticated illusion that engages all the senses. The next logical step is to gather your materials and begin experimenting with a small test piece, putting these ingenious secrets into practice.