Contrary to popular belief, a flawless resin finish doesn’t come from a torch or slow stirring, but from mastering the chemical reactions you’re initiating.
- Uncontrolled heat (exothermic reaction) is the primary cause of cracks and yellowing, not just mixing speed.
- A pressure pot doesn’t “pop” bubbles; it compresses them to invisibility by manipulating gas solubility, a far superior method.
Recommendation: Shift your focus from fixing symptoms (like bubbles) to controlling the core chemical processes of curing and heat dissipation for truly professional, glass-like results.
For any crafter or artist working with epoxy resin, the ultimate goal is a pristine, glass-like finish. Yet, the path is fraught with peril: mysterious bubbles, catastrophic cracks, and the dreaded yellowing that can ruin a piece months later. The internet is filled with quick tips—use a torch, stir slowly, pour in a warm room. While not incorrect, this advice only addresses the symptoms, not the cause. It treats a complex chemical process like a simple cooking recipe, leading to inconsistent results and endless frustration.
The perfectionist knows better. A crystal-clear finish is not an accident; it is the predictable outcome of controlled chemistry. The difference between an amateur and a master résinier lies in the understanding that you are not merely mixing liquids, you are initiating and managing an exothermic reaction. This guide departs from superficial tips to explore the fundamental science. We will delve into the thermodynamics of curing, the physics of bubble compression, the mechanisms of polymer degradation from UV light, and the principles of material science that allow resin to mimic solid metal.
Embracing this deeper knowledge is the only non-negotiable path to consistent, flawless results. It’s time to stop fighting your medium and start commanding it. This article will show you how to control every critical variable, from initial mix to final cure, ensuring your work achieves the crystalline perfection it deserves, every single time.
This comprehensive guide is structured to build your expertise from the foundational chemistry to advanced finishing techniques. The following sections will systematically deconstruct each challenge and provide scientifically-backed solutions.
Summary: The Science of a Flawless, Crystal-Clear Finish
- Why Mixing Too Much Resin at Once Can Cause It to Boil and Crack?
- How to Use a Torch or Pressure Pot to Get Bubble-Free Casts?
- 24-Hour Cure or Instant UV Light: Which Resin Suits Jewelry vs. Large Art?
- Why Your Clear Resin Turns Urine-Yellow in 2 Years?
- Why a Standard Dust Mask Won’t Stop Resin Fumes from Damaging Your Lungs?
- Why Conservation Varnish Must Be Removable Without Harming the Paint?
- Why You Need More Bronze Powder Than Resin to Polish to a Shine?
- Cold Casting Bronze: How to Make Resin Look and Feel Like Solid Metal?
Why Mixing Too Much Resin at Once Can Cause It to Boil and Crack?
The single most misunderstood aspect of working with epoxy is the exothermic reaction. This is not a gentle drying process; it is a chemical reaction that generates significant heat. When you mix resin (Part A) with hardener (Part B), you initiate a process of polymerization where molecules link together, releasing energy as heat. The problem arises from a simple principle of thermodynamics: volume versus surface area. A large, deep mass of mixed resin has a low surface-area-to-volume ratio, meaning it cannot dissipate the heat it generates. The heat builds upon itself, accelerating the reaction in a dangerous feedback loop.
This runaway reaction can cause the resin to heat up dramatically. According to resin chemistry experts, epoxy can reach temperatures between 120°F and 250°F (50°C to 120°C). This intense heat can cause the resin to boil, creating massive amounts of bubbles, or cure so rapidly that it generates immense internal stress, leading to cracks and fractures. This thermal decomposition is the enemy of clarity and structural integrity. Understanding this is the first step to mastery: your primary job is not to mix resin, but to manage heat.
Controlling this reaction requires a strategic approach. Always use wide, shallow mixing containers to maximize surface area for heat dissipation. For large projects, the only professional method is to work in small, manageable batches or pour in multiple thin layers, allowing each layer to partially cure and cool before adding the next. Never attempt a single, deep pour with a fast-curing resin unless it is specifically formulated for that purpose. Anything less is a gamble against fundamental chemistry.
How to Use a Torch or Pressure Pot to Get Bubble-Free Casts?
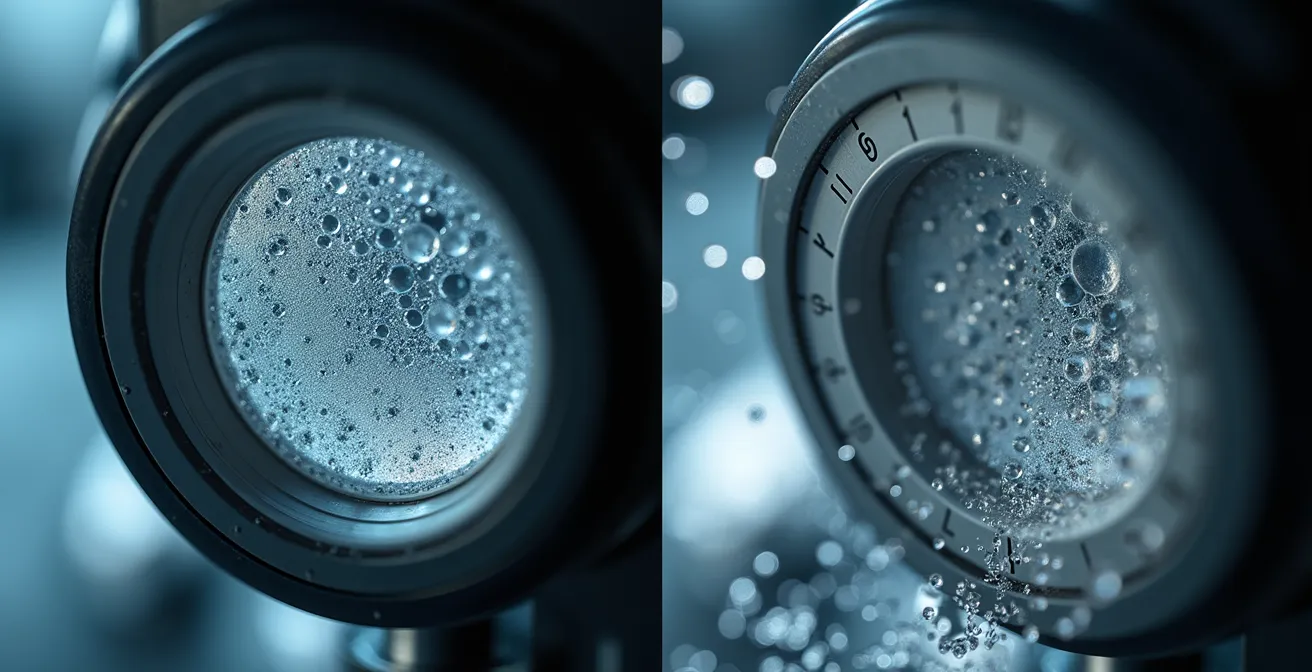
Bubbles are the bane of every resin artist. While a quick pass with a torch can pop surface bubbles, it is a superficial fix that fails to address the true problem: micro-bubbles suspended throughout the resin’s volume. These tiny bubbles, often introduced during mixing or from off-gassing of embedded objects, degrade the optical clarity and refractive index of the final piece, even if they aren’t individually visible. The mark of a true professional is a finish that is not just free of visible bubbles, but is optically pure. This requires a tool that addresses physics, not just heat: the pressure pot.
A pressure pot does not “pop” bubbles. It works by applying Henry’s Law, which states that the amount of dissolved gas in a liquid is proportional to its partial pressure above the liquid. By increasing the pressure inside the pot to 40-60 PSI, you dramatically increase the resin’s capacity to absorb the air inside the bubbles. The bubbles are not eliminated; they are compressed to a microscopic size and forced to dissolve back into the liquid resin, rendering them completely invisible and ensuring perfect, glass-like clarity.
This diagram shows how trapped air bubbles, which scatter light and create a cloudy appearance, are physically compressed under pressure to a size that no longer interferes with the optical clarity of the cured resin.
The choice of pressure is critical and depends on the application. Simple jewelry may require less pressure than complex castings with intricate voids that can trap air. A master résinier does not guess; they apply the correct pressure for the specific task to achieve a flawless result.
This table, based on an expert guide to pressure pot use, outlines recommended settings for various applications, demonstrating the precision required for professional work.
| Application Type | Recommended PSI | Pot Size Required | Key Considerations |
|---|---|---|---|
| Small jewelry/crafts | 40-50 PSI | 2.5 gallon | Standard pressure for bubble-free results |
| Medium castings | 50-60 PSI | 5 gallon | Higher pressure for complex molds |
| Pen blanks | 40-50 PSI | 2.5 gallon | Consistent pressure throughout cure |
| Complex voids (Cholla) | 60-70 PSI | 5 gallon | Extra pressure fills difficult recesses |
24-Hour Cure or Instant UV Light: Which Resin Suits Jewelry vs. Large Art?
The choice between a slow-curing two-part epoxy and a fast-curing UV resin is not a matter of preference, but of application. Each type has a distinct chemical profile designed for a specific purpose, and using the wrong one guarantees failure. The key difference lies in the cure mechanism and, consequently, heat generation and hardness. UV resin cures in minutes under a specific wavelength of light, making it ideal for small, thin applications like jewelry bezels or topcoats. However, the light cannot penetrate deeply, making it unsuitable for anything thicker than a few millimeters.
Conversely, two-part epoxy resins cure via a chemical reaction that can proceed in deep sections, making them the only choice for larger artworks, river tables, or deep encapsulations. They are further divided into casting resins and coating resins. Casting resins have a lower viscosity and are formulated with slower hardeners to manage the exothermic reaction in deep pours. For example, professional-grade systems like the Crystal Clear™ series offer specific formulations for different thicknesses, with some designed for pours greater than 6 inches thick. Using a thin-pour coating resin for a deep mold will inevitably lead to overheating and cracking.
For the perfectionist, the ultimate technique often involves a hybrid approach, leveraging the strengths of both systems to achieve a flawless result, particularly when encapsulating porous objects like wood or paper. These materials can release air for hours, creating a stream of bubbles that ruin a slow-curing epoxy pour. A master’s technique is to first seal the object with a thin, impenetrable layer of UV resin, cure it instantly, and only then proceed with the main pour using a slow-cure casting epoxy. This locks in the object and prevents any off-gassing.
Action Plan: The Hybrid Technique for Perfect Encapsulations
- Seal porous objects (wood, paper) with a thin layer of UV resin first.
- Allow the UV layer to fully cure under light to prevent off-gassing from the object.
- Mix a slow-cure epoxy for the main pour, following the exact manufacturer ratios.
- Let the mixed epoxy rest for up to 20 minutes for bubble release (applies to casting resins only).
- Pour slowly, ideally in thin layers for very deep encapsulations, to manage heat.
- Apply a final, thin UV resin topcoat for ultimate hardness and clarity on small pieces if desired.
Why Your Clear Resin Turns Urine-Yellow in 2 Years?
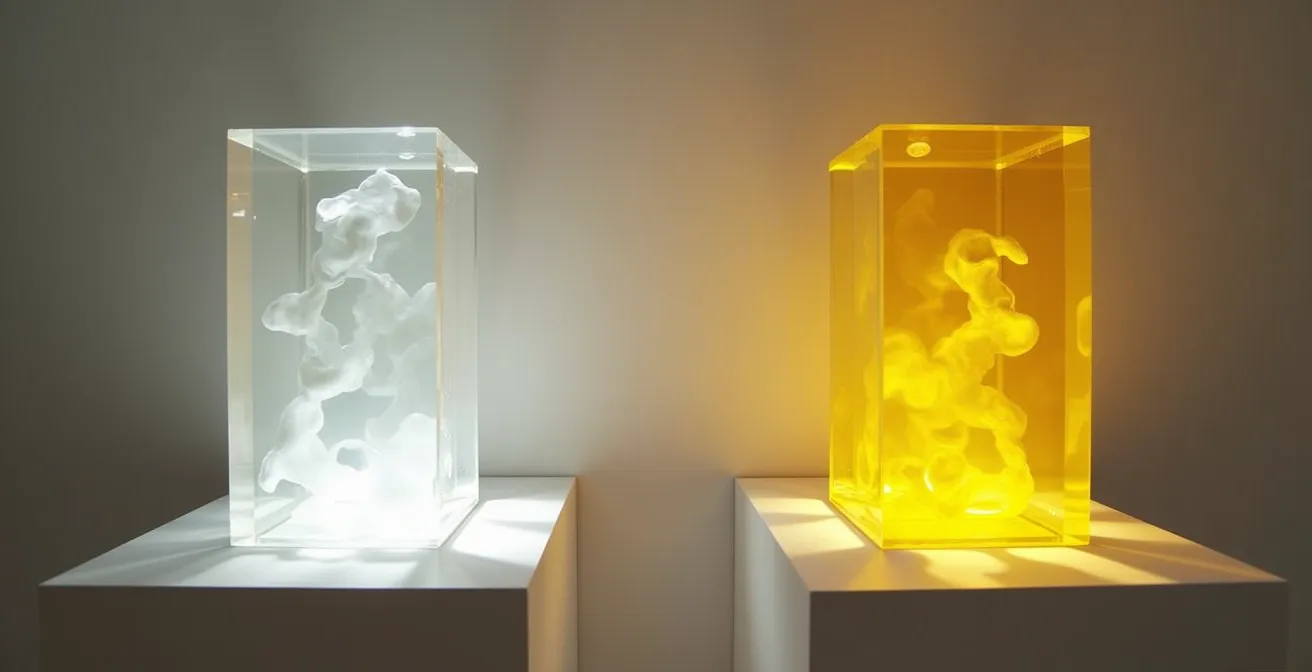
One of the most heartbreaking failures in resin art is when a crystal-clear piece slowly degrades into a sickly yellow hue over time. This is not a sign of a bad batch; it is the inevitable result of polymer degradation caused by ultraviolet (UV) light. The epoxy polymer chains are broken down by high-energy UV radiation, a process known as photodegradation, which manifests as yellowing and a loss of clarity. While all epoxies will eventually yellow with enough exposure, the speed and severity of this process depend entirely on the quality of the resin’s formulation.
This is where the distinction between cheap craft resins and professional-grade art resins becomes stark. Premium resins incorporate a sophisticated additive package to combat this degradation. As noted by formulation specialists, high-quality products contain two types of light stabilizers to offer advanced protection. These are typically a UV absorber, which functions like a sunscreen to block UV rays, and a Hindered Amine Light Stabilizer (HALS), which actively scavenges the free radicals produced by UV exposure, interrupting the yellowing process at a chemical level. Resins without this dual system will yellow significantly faster.
The visual difference between a resin with a robust UV protection package and one without is dramatic over time, as shown in this comparison.
However, even the best additives have their limits. An artist must be precise in their language and expectations. As one technical guide rightly points out, there is a crucial distinction to be made:
UV-resistant never means UV-proof.
– Apex Resin Technical Documentation, How to Achieve Crystal Clear Resin Guide
The ultimate protection for a finished piece is to keep it out of direct sunlight. The use of a high-quality resin simply buys you more time and preserves the integrity of the art for as long as chemically possible. For a perfectionist, settling for a resin without advanced UV protection is an unacceptable compromise.
Why a Standard Dust Mask Won’t Stop Resin Fumes from Damaging Your Lungs?
Safety in the resin studio is non-negotiable, yet it is an area rife with dangerous misinformation. The most critical error is believing that a standard dust mask offers any protection against resin fumes. This misunderstanding stems from a failure to differentiate between particulates (like dust) and gases. A dust mask is a simple mechanical filter designed to trap solid particles. The “fumes” from epoxy resin, however, are not solids; they are Volatile Organic Compounds (VOCs)—gaseous chemicals that pass directly through a dust mask’s filter.
Inhaling these VOCs can lead to respiratory irritation, allergic sensitization, and other long-term health issues. The danger is magnified significantly during an uncontrolled exothermic reaction. As demonstrated in safety studies, when resin overheats and begins to thermally decompose, it can generate a cocktail of highly toxic vapors, including carbon monoxide, ammonia, and aldehydes. This is not just an unpleasant smell; it is a serious chemical hazard. The only way to protect your lungs is to use the correct Personal Protective Equipment (PPE).
The minimum requirement for working with epoxy resin is a respirator mask fitted with organic vapor cartridges. These cartridges contain activated carbon, which adsorbs the VOCs at a molecular level, preventing them from being inhaled. This must be paired with a proper ventilation strategy. The goal is to create a negative pressure zone that pulls fumes away from your breathing area and exhausts them outside. Simply opening a window is insufficient; you need an exhaust fan actively pulling air out of the room. A master artist protects their work, but more importantly, they protect themselves with an uncompromising approach to safety.
Why Conservation Varnish Must Be Removable Without Harming the Paint?
For the artist whose work is destined for galleries or discerning collectors, the final step is not the cure—it is the protection. A common mistake is to consider the hard, glossy surface of cured epoxy as the final finish. While durable, the resin itself is susceptible to environmental damage over time, including minor scratches, abrasion, and the inevitable, slow-onset UV degradation. A perfectionist’s approach is to apply a sacrificial layer of conservation varnish over the fully cured resin.
The defining characteristic of a true conservation varnish is not its hardness or gloss, but its removability. The varnish is designed to be the layer that takes all the environmental abuse. Over many years, as the varnish collects dirt and begins to yellow or degrade, a professional art conservator can use a specific, mild solvent (like mineral spirits for MSA varnish) to dissolve and remove the old varnish layer without harming the original artwork—in this case, the resin—beneath. A fresh layer of varnish can then be applied, effectively restoring the piece to its original brilliance.
Applying a permanent varnish or polyurethane that cannot be removed without damaging the underlying epoxy is an amateur mistake. It permanently alters the original artwork and makes future conservation impossible. Therefore, the professional process involves meticulous testing. Before applying varnish to a finished piece, a master résinier will apply it to a test piece of the same cured resin. After it cures, they will test the specified solvent on a small corner to confirm that the varnish removes cleanly without clouding, softening, or otherwise damaging the epoxy surface. Only after this validation is the process repeated on the actual artwork.
Key Takeaways
- Master the exothermic reaction by managing heat through small batches and shallow pours to prevent cracks.
- Use a pressure pot, not just a torch, to compress micro-bubbles into invisibility for true optical clarity.
- Choose resin based on the job: UV for thin layers, slow-cure casting epoxy for deep pours. Never interchange them.
Why You Need More Bronze Powder Than Resin to Polish to a Shine?
The technique of “cold casting” is a masterful illusion: making resin look and feel like solid metal. The secret lies not in a special type of resin, but in the ratio and application of real metal powder. To achieve a convincing metallic finish that can be burnished and polished to a deep luster, the surface of the finished piece must be composed of more metal than resin. If the metal particles are too sparse and fully encapsulated within the resin, you are left with a plastic-looking piece with metallic specks. The goal is to have the metal particles so densely packed at the surface that the top layer is essentially a metal-matrix composite.
This is why a high powder-to-resin ratio is critical. Many artists aim for a mix that is at least 70% metal powder by volume, creating a thick, paste-like consistency. This metal-rich layer is often applied directly to the mold surface as a “gel coat.” This initial layer ensures the visible surface of the final cast is densely packed with metal. The rest of the mold is then back-filled with standard resin, which may contain less or no powder, providing structural strength without the expense of filling the entire volume with costly metal powder.
After demolding, the piece will have a dull, matte finish because a microscopic layer of resin still covers the metal particles. The magic happens during the burnishing process. By abrading the surface with fine steel wool (#0000) and then polishing it, you are physically removing that thin resin layer and exposing the raw metal particles beneath. It is these exposed particles that can then be polished to a high shine, creating a surface that is cold to the touch and reflects light just like solid, cast bronze. This tactile and visual authenticity is impossible to achieve with metallic paints or pigments.
Cold Casting Bronze: How to Make Resin Look and Feel Like Solid Metal?
Transforming humble resin into a piece with the heft and luster of solid bronze is the pinnacle of the resin caster’s art. This process, known as cold casting, relies on a precise, multi-step technique centered around the use of real metal powders. It is not enough to simply mix powder into resin; the application must be strategic to create a surface that can be worked like real metal. The professional standard for this is the gel coat method, which concentrates the effect where it matters most: the visible surface.
Case Study: Professional Metal Powder Techniques
Professional artists using the gel coat technique achieve unparalleled realism. As outlined in guides on advanced epoxy art basics, the process involves brushing a very metal-rich resin layer (the gel coat) into the mold first. This is allowed to become tacky before being back-filled with standard resin. This method is also critical for safety and stability, as high concentrations of metallic colors can generate significant heat during curing. After demolding, the burnishing process with steel wool exposes the metal particles just beneath the thin surface resin, creating an authentic metallic finish that convinces through both visual and tactile properties.
The process doesn’t end with polishing. To achieve the rich, aged appearance of true bronze, a patina must be applied. This is a chemical process that accelerates the natural oxidation of the metal. For a bronze or copper cold cast, exposing the burnished surface to ammonia fumes will create the classic blue-green verdigris effect. For iron cold casts, a rusting solution can be applied to develop an authentic rust patina. This level of detail—from the initial powder ratio to the final chemical aging—is what elevates a resin casting from a simple copy to a work of art that can stand on its own.
This entire process is a testament to the principles of material science. It requires patience, precision, and an understanding that you are creating a composite material. Each step, from the gel coat to the final wax seal over the patina, is deliberate and contributes to the final, masterful illusion of solid metal.
Now that you have mastered the science behind a flawless finish, the next logical step is to apply these principles with discipline and precision. Start by selecting the right materials for your project and committing to a safety-first workflow.