Your artistic skill is a given, but a 10-meter wall introduces challenges of physics and logistics that can ruin your work if you only think like a canvas painter.
- Scaling isn’t just drawing bigger; it’s choosing a method (grid, squiggle, anchor points) that fits the wall’s unique texture and lighting conditions.
- Material planning moves from guesswork to science with on-site test patches to accurately predict paint consumption based on surface porosity.
- Success depends on mastering the ‘unseen’ canvas: wall preparation, pH levels, and selecting access equipment that fits both your budget and the physical site.
Recommendation: To conquer the wall, you must shift your thinking from artist to a project manager who understands dimensional logistics.
The leap from a pristine canvas to a ten-meter brick wall is less about artistic ability and more about a fundamental shift in perspective. Many talented artists find their powerful designs look weak or their projects spiral out of control because they underestimate this transition. They diligently apply canvas-based techniques, only to face peeling paint, misjudged proportions, and budgets that evaporate halfway up the wall. The common advice—use a grid, get a projector, buy extra paint—barely scratches the surface of the real challenges involved.
These platitudes fail to address the core of the problem: a wall is not a bigger canvas. It is a dynamic, three-dimensional environment with its own physics, chemistry, and logistical demands. Issues like surface porosity, pH levels, access in confined spaces, and the psychological impact of lines at a massive scale are where murals are truly made or broken. This is the realm of dimensional logistics, a mindset that blends artistic vision with the practicalities of a small-scale construction project.
But what if the key wasn’t just to scale your drawing, but to scale your entire process? This guide moves beyond the basics to reveal the professional’s approach. We will deconstruct the critical decisions you’ll face, from transfer methods and paint calculation to surface preparation and equipment choice. This isn’t about how to draw bigger; it’s about how to *think* bigger and execute with the precision of a seasoned muralist.
By exploring these dimensions, you’ll learn to anticipate problems, manage resources effectively, and ensure your artwork translates with the power and permanence it deserves, no matter the scale.
This article breaks down the essential stages of a large-scale mural project, providing the dimensional thinking needed to transition from the studio to the street. The following sections offer a comprehensive roadmap for every key decision.
Summary: Mural Painting: From A4 Sketch to 10-Meter Wall
- Square Grid or Squiggle Grid: Which Scaling Method is Faster for Portraits?
- How to Estimate Paint Liters so You Don’t Run Out Halfway Up the Wall?
- Rollers or Spray: Which Covers Large Backgrounds Faster and Cheaper?
- The Peeling Paint: Why You Must Power Wash the Wall Before Starting?
- Boom Lift or Scaffolding: Which Access Equipment Fits a Narrow Alley?
- Why Your Art Looks Like a Postage Stamp on that Large Sofa Wall?
- Why Jagged Lines Trigger Anxiety While Curves Create Calm in Composition?
- Aerosol Mastery: How to Control Can Pressure for Laser-Sharp Lines?
Square Grid or Squiggle Grid: Which Scaling Method is Faster for Portraits?
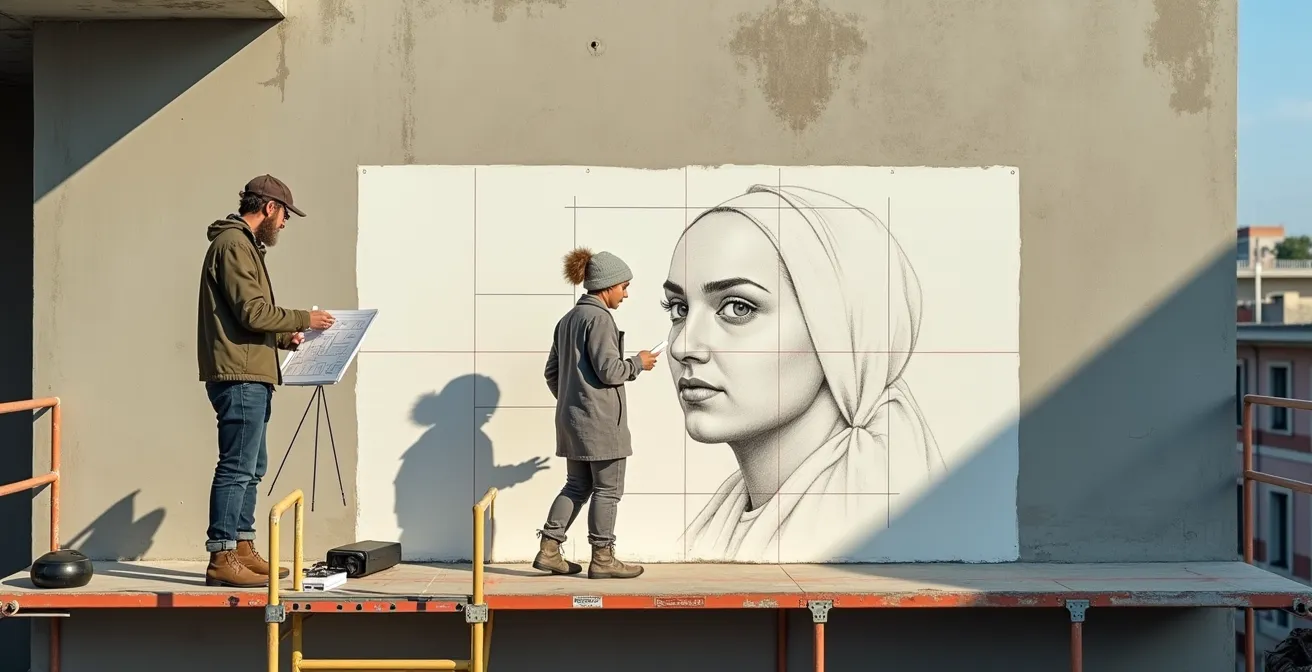
The classic square grid is the workhorse of scaling, but on a 10-meter wall, its rigid, time-consuming setup can become a project in itself. For artists transitioning from canvas, the choice of transfer method is the first critical step in managing workflow efficiency at scale. The best method is not universal; it’s dictated by the wall’s surface, ambient light, and the complexity of your design. A projector, for instance, is fast on a smooth, shaded wall but becomes useless on a heavily textured surface in direct sunlight.
This is where professional muralists adapt with more dynamic techniques. The “squiggle” or “doodle” grid is a faster, more intuitive method. It involves spraying abstract lines, letters, and shapes onto the wall, photographing it, and then overlaying your digital design. These random marks become unique reference points, allowing for a more organic transfer of the image. This approach is particularly effective for typography and designs where precision is key but a full grid is overkill.
Case Study: The Squiggle Grid for Precision Typography
Street artist Signs of Power adopted the scribble grid technique after seeing it on Instagram. For a large mural in Dundalk, they used letters, numbers, and random shapes drawn with spray paint directly on the wall. After photographing the prepared wall, they overlaid their digital artwork in Procreate, using the scribbles as reference points. This allowed them to transfer complex typography with high accuracy, proving the method’s effectiveness for detailed work at scale.
Ultimately, a hybrid approach often yields the best results. The “Digital Anchor Point” method uses a projector for only a few seconds to mark key anatomical landmarks—like the corners of the eyes, tip of the nose, and mouth corners. Once these anchor points are marked with chalk, the projector is turned off, and the artist connects them freehand, using their skill to establish proportions. A traditional grid can then be used for only the most complex areas, like hands. This combines digital speed with artistic intuition. The right choice depends entirely on your project’s specific conditions, as detailed in the comparative analysis below.
This decision matrix shows how pros select a scaling method based on environmental factors, not just personal preference. As a recent comparative analysis demonstrates, matching your technique to the wall is the first step in dimensional logistics.
| Wall Condition | Recommended Method | Tools Needed | Time Estimate |
|---|---|---|---|
| Heavily textured/Direct sunlight | Square Grid | Chalk, measuring tape, level | 2-3 hours setup |
| Smooth wall/Controlled lighting | Projector Method | Digital projector, laptop | 30-60 minutes |
| Curved or irregular surface | Squiggle/Doodle Grid | Spray paint, camera, tablet | 1-2 hours |
| Mixed conditions | Hybrid Digital Anchor | Projector + chalk | 1 hour |
Selecting the right method isn’t about finding a shortcut; it’s about making a strategic decision that respects the wall and optimizes your time, setting the stage for a successful project.
How to Estimate Paint Liters so You Don’t Run Out Halfway Up the Wall?
Running out of a custom-mixed color halfway up a boom lift is a nightmare scenario that plagues even experienced painters. The amateur’s mistake is relying solely on the coverage estimate printed on the paint can. This number is based on ideal, non-porous surfaces—a reality that almost never exists in the world of exterior murals. A wall’s texture and porosity are the dominant factors in paint consumption, a core principle of surface physics that cannot be ignored.
A rough brick wall can absorb two to three times more paint than a smooth, sealed surface. Standard manufacturer guidelines, which suggest a coverage of approximately 400 sq.ft./gallon for medium viscosity colors, must be treated as a baseline, not a guarantee. Furthermore, certain colors, especially vibrant reds and yellows, have poor opacity and may require multiple coats, increasing consumption by 30-40% or more. The only way to get an accurate estimate is to test the paint on the actual surface.
This is where the professional’s on-site test patch method becomes non-negotiable. This simple diagnostic tool removes all guesswork and provides a real-world consumption rate for your specific project.
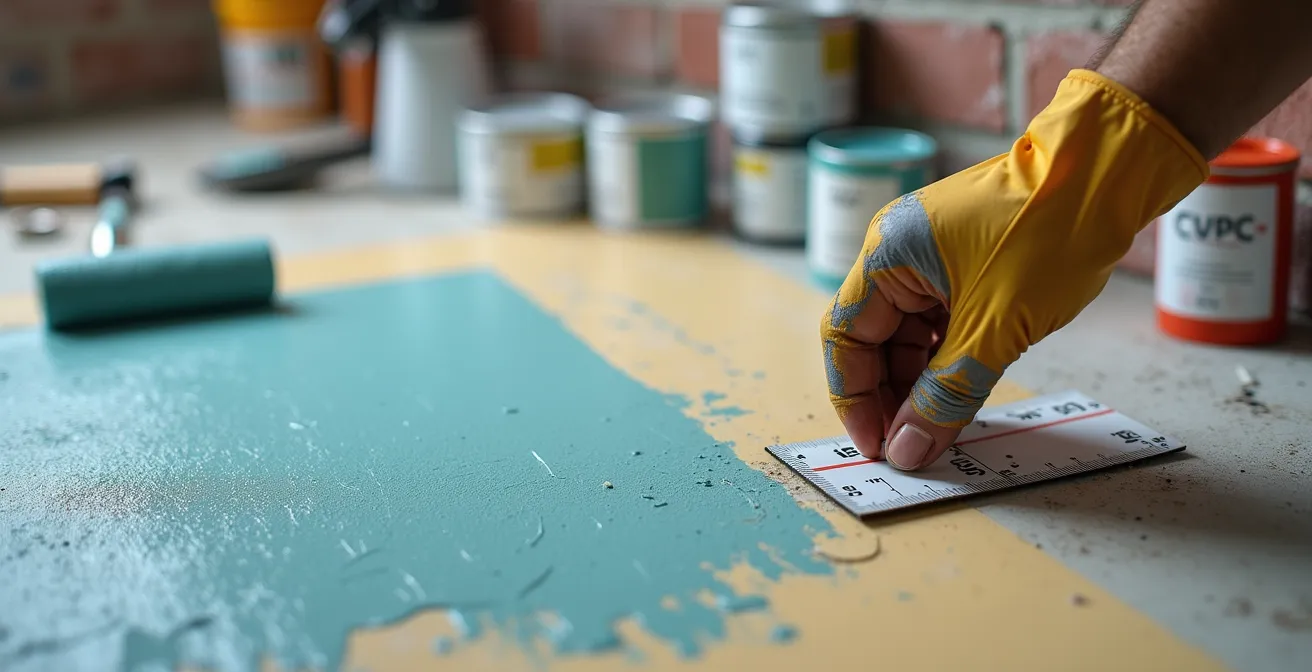
As the image illustrates, this process involves direct interaction with your unique “canvas.” By measuring precisely how much paint is used to cover a small, defined area, you create a project-specific formula. The steps are straightforward:
- Mark out exactly 1 square meter on your actual wall surface.
- Apply your base color using your chosen application method (roller, sprayer, brush).
- Measure the exact amount of paint used for this test area.
- Multiply by the total wall area, then add 25% extra for custom colors that can’t be easily rematched.
- For colors like reds and oranges, add an additional 30-40% due to their inherent low opacity.
- Always mix custom colors in one large batch to ensure color consistency across the entire mural.
This methodical approach transforms paint estimation from a gamble into a calculated part of your dimensional logistics, saving you time, money, and the stress of a mid-project crisis.
Rollers or Spray: Which Covers Large Backgrounds Faster and Cheaper?
When faced with a vast background, the choice between an airless sprayer and a traditional roller seems simple: spray is faster, right? Not necessarily. A professional muralist thinks in terms of total project time, not just application speed. This is workflow efficiency in action. An airless sprayer can lay down paint incredibly fast, but this speed comes with a significant time cost in preparation and cleanup. Extensive masking is required to protect surrounding areas from overspray, a process that can take hours.
A roller, on the other hand, requires minimal masking but a much greater physical effort and time commitment during application. The choice also has financial and material implications. Sprayers have higher rental costs and can waste 20-30% of your paint in overspray, whereas a roller and tray are cheap, with minimal paint waste. The decision hinges on the project’s specific context: is the site an isolated wall where overspray is a non-issue, or a busy urban street requiring meticulous protection?
The total time investment for both methods can often be surprisingly similar, making the decision more about workflow preference and surface texture. A sprayer provides a thin, even coat, while a roller leaves a distinct texture that can be desirable or distracting, depending on the art style. For a complete picture, a side-by-side comparison of the entire process is essential.
The following data, based on a breakdown of common mural techniques, highlights the hidden time costs associated with each method.
| Factor | Airless Sprayer | Roller Application |
|---|---|---|
| Masking Time | 3-4 hours | 30 minutes |
| Application Time (100 sq m) | 2 hours | 6 hours |
| Cleanup Time | 1.5 hours | 30 minutes |
| Total Time | 6.5-7.5 hours | 7 hours |
| Equipment Cost | $50-100/day rental | $15 roller + tray |
| Paint Waste | 20-30% overspray | 5-10% absorption |
Many professionals don’t choose one over the other; they combine them.
Case Study: The ‘Back-Rolling’ Hybrid Technique
Mural artist Morgan Bricca of Morgan Mural Studios champions the ‘back-rolling’ technique for large backgrounds. She uses an airless sprayer with self-priming latex house paints for the initial fast coverage, then immediately follows with a roller. This second step evens out the texture, works the paint into the surface, and completely eliminates any tell-tale spray lines. This hybrid approach combines the speed of spraying with the superior finish and adhesion of rolling, representing a highly efficient professional workflow.
Ultimately, the “faster” method is the one that aligns best with your project’s constraints, budget, and desired finish, a key decision in your overall project management.
The Peeling Paint: Why You Must Power Wash the Wall Before Starting?
Paint adhesion failure is the most catastrophic and preventable mural disaster. When a finished piece begins to peel or flake, the cause is almost never the paint itself; it’s a failure of preparation. A wall is a complex chemical substrate, and treating it like an inert canvas is a recipe for failure. This is the domain of surface physics, where understanding dirt, pH, and moisture is more important than color theory. Even a wall that looks clean is likely covered in a fine layer of dust, grease, and pollutants that will prevent the primer and paint from forming a permanent bond.
Power washing with a trisodium phosphate (TSP) solution is the mandatory first step. It’s not just cleaning; it’s a chemical and physical reset of the surface. This process removes all contaminants and any loose, pre-existing paint. However, cleaning is only half the battle. The wall must be allowed to dry completely—often for 24-48 hours—as trapped moisture will push the paint off from behind. Furthermore, environmental conditions during application are critical; professional mural preparation standards dictate that painting should not occur below 50°F.
Even after cleaning, you must verify that the surface is sound. Underlying structural issues like cracks or persistent mold must be addressed, as they will eventually telegraph through your finished artwork. Pros don’t guess about adhesion; they test it. The professional adhesion test is a simple but crucial protocol to confirm the wall is ready for paint. It provides definitive proof that your primer has bonded correctly to the substrate.
Your Action Plan: Professional Adhesion Test Protocol
- Clean the wall with a TSP (trisodium phosphate) solution and power wash thoroughly.
- Allow the wall to dry completely for a minimum of 24-48 hours, checking for damp spots.
- Apply the appropriate primer for the surface (e.g., Matte Medium for smooth, Matte Gel for rough textures).
- After the primer is fully cured, press a piece of high-tack gaffer tape firmly onto the primed surface.
- Rip the tape off quickly at a sharp, 45-degree angle. If any primer or paint comes off with the tape, the surface preparation is incomplete and must be repeated.
Skipping this stage to save a day or two is the most expensive mistake an artist can make. A properly prepared wall is the true foundation of a permanent, professional mural.
Boom Lift or Scaffolding: Which Access Equipment Fits a Narrow Alley?
Working at height introduces an entirely new set of challenges that are central to dimensional logistics. Your choice of access equipment—boom lift, scaffolding, or a vertical mast lift—is not just a matter of reaching the top of the wall. It directly impacts your artistic workflow, your budget, and your ability to even access the site. A narrow alley might physically preclude the use of a boom lift, which requires a wide footprint for its outriggers, making scaffolding the only viable option despite its longer setup time.
The equipment defines your mobile studio. A boom lift basket is often cramped, forcing you to work in tight quarters with limited supplies and constant movement. Scaffolding, by contrast, provides a stable, spacious platform where you can organize paints and tools, step back to view your work, and maintain a consistent physical relationship to the wall. This stability can be crucial for detailed work. However, this stability is static; moving a large scaffolding structure is a major undertaking, whereas a boom lift offers quick repositioning.
Here, the visual context of the challenge is paramount. An artist must think like an urban planner, assessing the constraints of the environment before any paint is purchased.
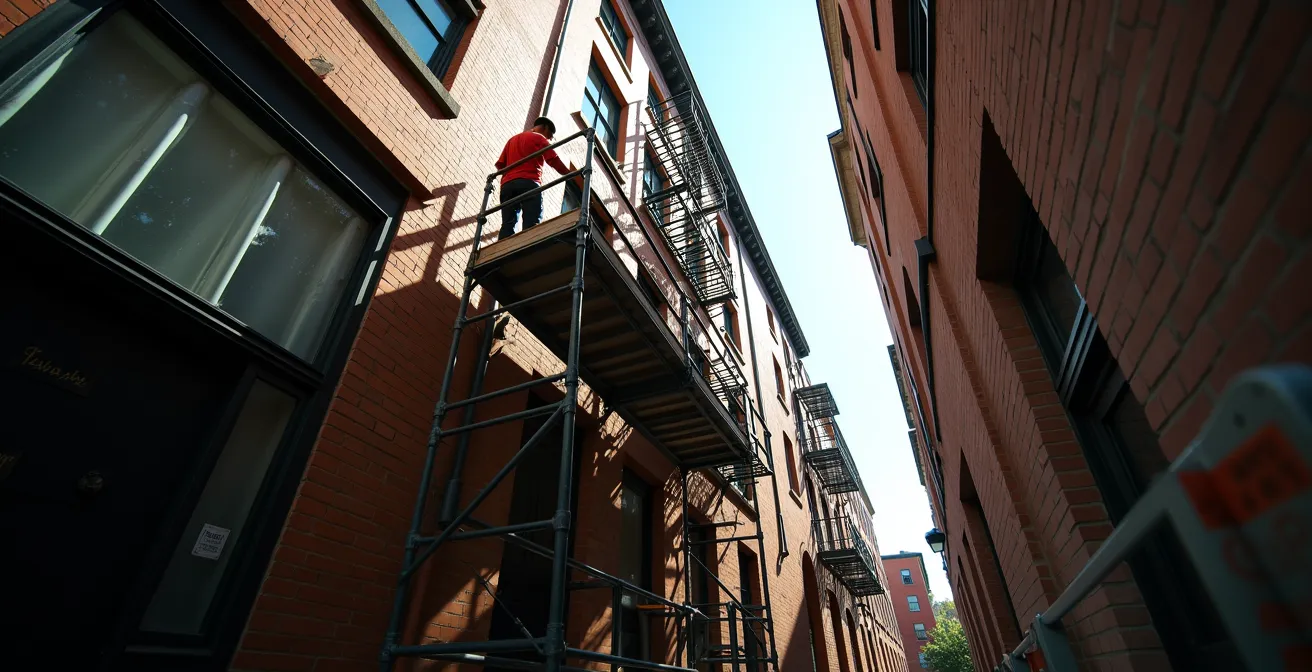
As this image of a tight urban alley shows, the physical space dictates the solution. Here, a compact mobile scaffold tower offers a compromise between the stability of fixed scaffolding and the mobility of a lift. Understanding the trade-offs in setup time, daily cost, required footprint, and artistic workflow is essential for making a sound logistical decision.
A detailed comparison, based on data from guides for professional muralists, puts these trade-offs into sharp focus.
| Equipment Type | Minimum Width Required | Setup Time | Daily Cost | Artistic Workflow |
|---|---|---|---|---|
| Boom Lift | 8-12 ft with outriggers | 30 minutes | $200-400 | Cramped basket, constant motion |
| Scaffolding | 5-6 ft fixed | 2-3 hours | $50-100 | Stable platform, room for supplies |
| Vertical Mast Lift | 3-4 ft | 15 minutes | $150-250 | Single person, limited reach |
| Mobile Scaffold Tower | 4-5 ft | 1 hour | $75-125 | Good compromise, moveable |
This decision is a cornerstone of your project’s budget and timeline. Choosing correctly ensures a safe, efficient, and creatively productive environment.
Why Your Art Looks Like a Postage Stamp on that Large Sofa Wall?
When you scale a drawing to a massive wall, the rules of composition are magnified and distorted. An artwork that feels balanced on an A4 page can feel small, lost, or awkward on a large interior wall, especially one anchored by a large piece of furniture like a sofa. This is the challenge of scale perception. The negative space around the artwork becomes an active, and often overwhelming, compositional element. The common mistake is to simply center the art, which often makes it look like a “postage stamp” floating in a sea of empty wall.
Professional interior designers and muralists combat this by thinking about the artwork not as an isolated object, but as a force that must actively claim its territory. The goal is to make the art and the wall feel like a single, cohesive unit. One of the most effective tools for this is the Rule of Thirds. By placing the focal point of your mural at one of the four intersecting points of a 3×3 grid, rather than dead center, you create a more dynamic and visually engaging composition that naturally draws the eye and interacts with the surrounding space.
In a children’s bedroom mural inspired by Roald Dahl, interior designer Ruth Stolerman demonstrated how careful planning of scale was key to success. She notes that murals are particularly effective above beds, as they provide large-scale impact without the perceived danger of heavy, framed artwork. The success of the project relied on a clear vision and reference images to ensure the characters were scaled appropriately to the room and furniture, creating an immersive world rather than just a wall decoration.
To avoid the postage stamp effect, you must employ strategies that expand your art’s visual footprint:
- Asymmetrical Placement: Use the Rule of Thirds to position your main subject off-center.
- Create a ‘Color Echo’: Paint a large, simple geometric shape behind your artwork using a color pulled from the piece itself. This acts as a mat, visually anchoring and enlarging the composition.
- Wall-Wash Lighting: Install wide-beam lighting above the artwork to illuminate not just the piece, but a large portion of the wall, expanding its presence.
- Consider Furniture: Your artwork should begin 6-10 inches above the back of a sofa. This creates a deliberate relationship between the two objects.
- Group Small Pieces: If your art is genuinely small, group it with other pieces to form a larger collective shape, applying the Rule of Thirds to the entire arrangement.
By treating the entire wall as your canvas and actively managing the negative space, you ensure your artwork has the monumental impact it deserves.
Why Jagged Lines Trigger Anxiety While Curves Create Calm in Composition?
On a ten-meter wall, a line is no longer just a line; it’s an architectural feature. Every curve, angle, and stroke is amplified, and its emotional impact on the viewer is magnified tenfold. This is the psychological dimension of scale perception. A sharp, jagged line that looks energetic on paper can feel aggressive or anxiety-inducing when it’s two meters tall. Conversely, a gentle curve that is barely noticeable in a sketch can become a powerful source of calm and tranquility when it sweeps across an entire building.
Our brains are hardwired to interpret lines and shapes in specific ways. Sharp angles and zigzags trigger a primal sense of caution, associated with danger (thorns, teeth, broken glass). Smooth, flowing curves, on the other hand, evoke nature (hills, rivers, the human form) and create feelings of safety and serenity. As a muralist, you are not just drawing; you are sculpting the emotional landscape of a public or private space. Understanding this “Emotional Line Lexicon” allows you to consciously control the mood your artwork projects.
The key is to use these line types with intention, fully aware of their amplified effect at scale. A composition dominated by aggressive diagonal or sharp vertical lines can make a space feel unsettling, whereas a design built on broad, horizontal curves can make it feel stable and peaceful. This is a powerful tool for site-specific work; a mural in a hospital or wellness center would benefit from calming S-curves, while one in a sports complex might intentionally use dynamic diagonals to generate energy.
Here is a practical lexicon for deploying lines with emotional intelligence at a large scale:
- Slow S-Curves: Long, 2-3 meter sweeps create a sense of flow and tranquility. Ideal for healthcare settings or calming spaces.
- Sharp Zigzags: Acute angles (under 45°) generate tension and high energy. Use them sparingly as accent points to avoid overwhelming the viewer.
- Horizontal Flowing Lines: Extending the full width of a wall, these lines suggest stability, calm, and horizon. They are visually grounding.
- Vertical Broken Lines: A series of vertical dashes adds rhythm and structure without the aggression of a solid, imposing line.
- Diagonal Dynamics: Diagonals at a 30-45° angle inject movement and excitement without causing anxiety. Limit them to about one-third of the composition to maintain balance.
- Circular Motifs: As a universal symbol of unity and comfort, large circles (1-2 meters in diameter) can provide a powerful focal point of calm.
By consciously choosing the character of your lines, you move beyond simple decoration and become an architect of feeling, shaping the experience of everyone who encounters your work.
Key Takeaways
- Scaling a mural requires a shift from an artist’s mindset to a project manager’s, focusing on logistics, surface physics, and workflow.
- Accurate paint estimation is impossible without an on-site test patch to measure the actual porosity and texture of the wall.
- True adhesion is a chemical process. Proper cleaning, drying, and adhesion testing are non-negotiable steps to prevent paint failure.
Aerosol Mastery: How to Control Can Pressure for Laser-Sharp Lines?
After conquering the challenges of scaling, planning, and preparation, the final execution comes down to technique. For many muralists, especially those working in an urban style, aerosol paint is the tool of choice. However, mastering an aerosol can is a physical skill entirely different from wielding a brush. Achieving laser-sharp lines or soft, blended fades is not about the can itself, but about controlling the “Holy Trinity” of aerosol art: distance, speed, and cap selection.
Your arm becomes a mechanical compass. To create a consistent line, you must lock your wrist and move your entire body, maintaining a perfectly uniform distance from the wall (typically 6-12 inches). Any fluctuation in this distance will alter the line’s thickness and sharpness. Speed is the second variable: a fast pass creates a thin, faint line, while a slow movement deposits more paint, resulting in a thick, bold line. Finally, the cap is your “brush tip.” A needle cap is for fine details under 1cm, while a fat cap is for filling large areas over 10cm wide. Without mastering these three elements in concert, control is impossible.
But true aerosol masters manipulate a fourth variable: can pressure. The pressure inside the can determines how the paint is atomized and ejected. You can manipulate this by controlling the can’s temperature. Warming a can in lukewarm water for a few minutes increases the internal pressure, resulting in a harder, faster spray that is ideal for crisp, solid lines. Conversely, cooling a can in the shade allows for a softer, lower-pressure spray, perfect for creating transparent layers and subtle, dusty effects. It’s also worth noting that for artists who cannot use aerosols for health reasons, tools like high-quality paint markers (e.g., Posca or MTN Street Paint Markers) offer a high degree of precision without the fumes.
Here are the core techniques for achieving total line control with an aerosol can:
- Lock Your Wrist: Move your entire arm and body, not just your hand, to maintain a consistent distance from the wall.
- Control Your Speed: A fast hand movement results in thin lines; a slow movement creates thick lines. Practice consistent speed for uniform strokes.
- Choose the Right Cap: Select your cap based on the desired line width. Needle caps for details, standard caps for outlines, and fat caps for fills.
- Warm Cans for Hard Lines: Place cans in lukewarm water (never hot) for 5-10 minutes to increase pressure for a more forceful, crisp spray.
- Cool Cans for Soft Effects: Let cans rest in a cooler or shade to decrease pressure for softer, more transparent output.
- Use Shields for Crisp Edges: For perfectly clean lines, use a piece of cardboard or low-tack stencil film as a movable mask.
By mastering these physical techniques, you gain the ability to translate the precision of your studio work to a massive scale, ensuring every line on the wall is as intentional as the ones on your paper sketch.