
text
Achieving lifelike virtual sculptures hinges not on software mastery, but on applying timeless artistic principles of structure and light to the digital medium.
- Proper topology is the non-negotiable foundation for believable deformation and animation.
- Lighting isn’t an afterthought; it’s a primary sculpting tool used to carve form and create drama.
Recommendation: Shift your focus from learning more buttons to understanding the ‘why’ behind form, structure, and light to give your digital creations true artistic weight.
You’ve spent hours pushing and pulling digital clay, meticulously following tutorials, and yet, the result feels… off. Your characters look more like plastic dolls than living beings, your monsters lack menace, and the forms, while technically correct, have no soul. It’s a common frustration for 3D artists. We learn the software, master the hotkeys, and collect gigabytes of brushes, but our creations still lack the fundamental presence of a physical sculpture. The tools in ZBrush or Blender are powerful, but they don’t teach you how to see.
The web is saturated with advice to “practice more” or lists of “top 10 brushes.” But this misses the point. The problem isn’t a lack of technical skill; it’s a deficit in foundational thinking. True virtual sculpting isn’t about manipulating polygons; it’s about understanding anatomy, structure, form, and light. It’s about building a digital carcass with intent, wrapping it in a skin that respects its underlying flow, and then using light as a chisel to reveal its story. The secret to breathing life into digital clay isn’t in the software, but in applying the age-old principles of sculpture to this new frontier.
This guide will shift your perspective. We won’t just talk about tools; we’ll delve into the architectural principles that separate a mere 3D model from a true work of digital art. We’ll explore the critical role of topology, the art of texturing without distortion, the philosophical choice between organic and geometric methods, and how to use light not just to illuminate, but to define. Finally, we’ll see how mastering these fundamentals allows you to break the rules, defy gravity in the metaverse, and make intentional stylistic choices that elevate your work from simple optimization to high art.
This article explores the core tenets that will elevate your digital work. Below is a summary of the key areas we will cover to help you transition from a 3D modeler to a true virtual sculptor.
Summary: The Art of Breathing Life into Digital Clay
- Why Bad Topology Will Ruin Your Character When You Try to Animate It?
- How to UV Unwrap a Monster Face Without Stretching the Skin Texture
- Organic Clay Brushes or Geometric Extrusion: Which Method is Faster for Heads?
- The Crashing Viewport: Why You Need to Retopologize Before Rendering?
- How to Set Up a 3-Point Light System to Show Off Your Sculpting Details?
- Why Your Heavy Impasto Painting Might Need Reinforced Wall Anchors?
- Why Sculpture in the Metaverse Doesn’t Need a Base or Gravity?
- Polygon Aesthetics: Why Low-Poly Art Is a Style Choice, Not Just an Optimization?
Why Bad Topology Will Ruin Your Character When You Try to Animate It?
Before you even think about the heroic pose or the subtle facial expression, you must build the character’s digital carcass. This is topology: the invisible, structural framework of your model. Bad topology is like building a skyscraper on a foundation of sand. The moment you apply pressure—in our case, the rig for animation—the whole thing collapses into an unnatural mess of pinched vertices and twisted polygons. Skeletal animation relies heavily on good topology, with logical edge loops that follow the natural flow of muscles and skin. This isn’t just a technical requirement; it’s the anatomical basis for believable movement.
Think of edge loops as the lines of force and movement in a body. For a character to smile without their cheek clipping through their eye, or to bend an elbow without their arm looking like a bent straw, the polygons must be arranged to facilitate that specific deformation. It’s about placing your “polygonal intent” where it matters most. As the community-driven Polycount Wiki Topology Guide expertly points out, this is especially critical in high-deformation zones.
Topology is the most important where the model has to deform the most: crotch/hips/butt, shoulders/armpits, mouth corners/cheeks, knees, elbows, hands/fingers.
– Polycount Wiki Contributors
To truly grasp this, visualize the mesh as a system of digital muscle fibers. Each quad should contribute to the flow and function of the form, especially around joints where tension and compression occur. Neglecting this is the primary reason why a beautifully sculpted static model can turn into a horrifying puppet show in motion.

As this visualization shows, the flow of polygons should mimic the underlying anatomical structure. Good topology is not about creating a dense, uniform grid; it’s about strategically directing the flow of geometry to support the form and its intended motion. This is the first and most crucial step in creating a sculpture with virtual weight and presence.
How to UV Unwrap a Monster Face Without Stretching the Skin Texture
Once you’ve built a solid digital carcass, the next step is giving it a skin. This is the process of UV unwrapping, a task often seen as a tedious technical chore but one that is deeply artistic. Poorly unwrapped UVs will cause your carefully crafted textures to stretch, pinch, and distort, destroying all your hard work. For a complex form like a monster’s face, with all its horns, scars, and wrinkles, the challenge is immense. The secret lies in thinking less like a software operator and more like a craftsman—a practitioner of digital taxidermy. You must decide where to make your incisions (seams) to lay the “hide” (the mesh) flat with minimal distortion.
The key is to hide your seams where they naturally occur or where the viewer is least likely to see them. In traditional taxidermy, seams are placed along folds of skin or under the belly. In digital sculpting, the principle is identical. Place your primary seams in crevices, behind the ears, under the jawline, or along sharp edges where a texture change would feel natural. This method transforms a technical problem into a creative one, ensuring the integrity of your surface details. Professional workflows in game development, as noted by studios like Thunder Cloud, prioritize this strategic mapping to get maximum detail from every pixel of texture.
Action Plan: The Digital Taxidermy Method for UV Seams
- Place primary seams: Identify and mark seams along natural creature fold lines, like where real hide would be stitched or where armor plates would meet.
- Create hidden secondary seams: For necessary cuts that don’t follow natural lines, place them in areas typically hidden from the camera’s view, such as behind the ears, under the jaw, or on the sole of the foot.
- Leverage symmetry: Use symmetry tools to mirror your seam placement. This not only saves time but ensures your texture application will be consistent on both sides of the model.
- Test with a checker pattern: Before committing to hours of texturing, apply a simple checkerboard pattern to your model. This will immediately reveal any areas of stretching or compression, allowing you to adjust your seams.
- Optimize island packing: Arrange your flattened UV “islands” to maximize the use of the texture space. Critically, allocate more resolution (a larger island) to focal points like the face and eyes.
By adopting this mindset, UV unwrapping ceases to be a chore and becomes an integral part of the sculpting process. It’s the art of preparing your canvas, ensuring that the story you tell with your textures is clear, sharp, and free from distracting technical flaws.
Organic Clay Brushes or Geometric Extrusion: Which Method is Faster for Heads?
When starting a sculpt, particularly something as complex as a human head, artists face a fundamental philosophical choice: do you work like Rodin or Brancusi? Do you start with a lump of digital clay and intuitively add and remove mass (the organic brush approach), or do you build the form with precise, calculated geometry (the box modeling/extrusion approach)? The question of which is “faster” is misleading. The real question is about control versus freedom. Organic brushes, found in programs like ZBrush with DynaMesh or Blender’s Sculpt Mode, offer incredible speed and artistic liberty in the initial blocking stage. You can focus purely on form and silhouette without worrying about polygons. It’s an additive process, perfect for exploration.
On the other hand, geometric extrusion or box modeling is a more deliberate, subtractive process. It’s slower initially but gives you absolute control over your topology from the very beginning. This method is ideal for achieving technical accuracy, perfect symmetry, or preparing a model that needs to meet strict polycount budgets for games or animation. As master digital portrait artist Ian Spriggs mentions in his work, the highest level of realism often comes from a deep understanding of the underlying structure, referencing anatomical books, X-rays, and medical scans. This level of precision can be more directly translated through a geometric approach.
Ultimately, the most effective method is often a hybrid. Many artists begin with the freedom of organic brushes to find the primary forms and establish the character’s personality. Then, they retopologize this rough sculpt to create a clean, controllable base mesh, and continue refining with a mix of sculpting and traditional modeling techniques. The choice depends on the final goal and your personal workflow.
This comparative table highlights the core differences between the two primary approaches to sculpting form.
| Method | Speed | Best For | Workflow Type |
|---|---|---|---|
| Organic Brushes (Clay/DynaMesh) | Fast initial blocking | Artistic exploration, asymmetry | Additive (like Rodin) |
| Geometric Extrusion | Slower but precise | Technical accuracy, symmetry | Subtractive (like Brancusi) |
| Hybrid Cranium-Out | Balanced | Anatomically correct portraits | Combined approach |
The Crashing Viewport: Why You Need to Retopologize Before Rendering?
You’ve done it. You’ve sculpted a masterpiece with 30 million polygons. Every pore, wrinkle, and scale is rendered in glorious detail. Then, you try to rotate the model in the viewport. The screen freezes. The application crashes. Welcome to the inevitable wall every digital sculptor hits. A high-polygon sculpt is a beautiful, but profoundly heavy and unstable, entity. It’s an artistic sketch, not a finished product. Attempting to texture, rig, animate, or even render this raw data is a recipe for disaster. This is where retopology comes in—the process of building a new, clean, and lightweight mesh over the surface of your high-detail sculpt.
Retopology is not about losing detail; it’s about optimizing it. The process transforms your ephemeral, multi-million-polygon sculpt into a durable, production-ready asset. By creating a clean quad-based mesh, you provide a perfect canvas for UV unwrapping and texturing. More importantly, you create a model that animators can actually deform and that rendering engines can handle without catching fire. As explained in a report by Reallusion Magazine, models become far less computationally intensive after this process, allowing for a balance between detail and performance.
Case Study: The Professional Retopology Workflow
Studios like CGTyphoon demonstrate that the primary function of retopology is to translate a high-poly sculpt into a usable asset for a production pipeline. The process is essential for simplifying complex models, which in turn improves shading quality by allowing for smooth normal mapping. Furthermore, it dramatically reduces the load on game engines and rendering software. Most critically for character work, the clean, intentional edge flow created during retopology is what enables proper, natural-looking deformation during animation. It is the bridge between a static digital statue and a living, breathing character.
Think of it as casting your fragile clay master in bronze. The retopology process captures all the essential form and detail of your original sculpt but gives it a permanent, efficient, and usable structure. It is the final, crucial step in solidifying your artistic vision into a tangible digital reality.
How to Set Up a 3-Point Light System to Show Off Your Sculpting Details?
You have built a perfect digital carcass, wrapped it in a flawless skin, and cast it into a final, optimized form. Now, how do you present it? Many artists make the mistake of dropping their masterpiece into a scene with flat, uniform lighting. This is the digital equivalent of hiding a Michelangelo in a dimly lit closet. Light is not just for illumination; light is a sculpting tool. A well-designed lighting setup can carve out forms, emphasize texture, create mood, and tell a story all on its own. The classic three-point lighting system is the foundation for this.
The system consists of three lights:
- The Key Light: Your main light source. It’s the strongest and establishes the primary shape, dimension, and texture of your sculpt. Placing it off-center creates dramatic shadows that define the form.
- The Fill Light: A softer, secondary light placed on the opposite side of the Key Light. Its job is not to create new shadows but to gently fill in the darkest areas, revealing details that would otherwise be lost in blackness. It controls the mood by managing the contrast.
- The Rim Light (or Backlight): Placed behind the subject, this light is the secret to making your sculpt “pop” from the background. It creates a bright, sharp outline—a “rim”—that defines the silhouette and separates the character from its environment, giving it a sense of depth and volume.
These aren’t rigid rules but a powerful starting point. By adjusting the intensity, color, and position of these three lights, you can create an infinite range of moods, from the high-contrast drama of chiaroscuro to the soft, even light of a beauty shot. You are not just lighting a model; you are carving it with photons, using shadow and highlight as your chisel and hammer. You are designing light-catchers, turning surfaces and edges into dramatic storytellers.
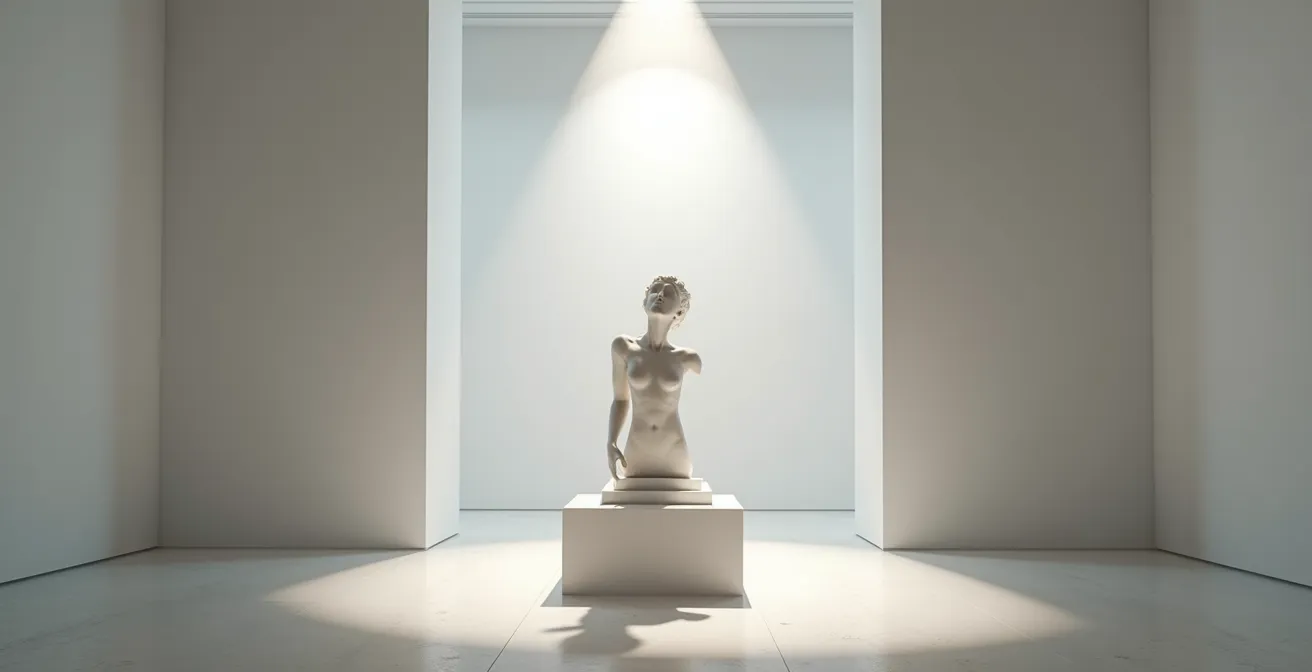
Ultimately, lighting is the final performance. It’s the moment you choose how the world will see your creation. A great sculpt with poor lighting is a missed opportunity, while a good sculpt with masterful lighting can become an unforgettable piece of art.
Why Your Heavy Impasto Painting Might Need Reinforced Wall Anchors?
In traditional painting, “impasto” refers to a technique where paint is laid on so thickly that it stands out from the canvas, creating tangible texture. In the digital realm, we face a similar, albeit metaphorical, choice. Do we create “digital impasto” by sculpting every single pore, scale, and fabric weave into the actual geometry? Or do we create the illusion of texture using clever maps on a simpler surface? The first approach results in a “heavy” model with an astronomical polygon count. This can be visually stunning but, as a practical guide from RenderHub notes, high polygon counts can bog down rendering and the entire modeling process.
This “heavy” sculpt is the digital equivalent of a painting so laden with thick paint that it threatens to pull its own anchors from the wall. It’s a massive, unwieldy file that requires a beast of a machine to even navigate. While it offers the truest representation of form, its practicality in any production pipeline—be it for games, film, or animation—is severely limited. The alternative is a “lighter” approach. Here, the artist sculpts the primary and secondary forms, but the fine, tertiary details (like skin pores or fabric texture) are “painted” on using Normal or Displacement maps. This is a form of trompe-l’œil, creating a convincing illusion of high detail on a much lower-polygon, more efficient model.
Professional studios, as outlined by Pixune, constantly navigate this trade-off. The choice between literally sculpting every stroke into the geometry versus using texture maps is a fundamental decision about resource allocation. There is no right answer. A hero character model for a film closeup might justify the “heavy” digital impasto approach, while an asset for a real-time game engine will almost certainly rely on the “lighter” illusion. Understanding this balance between physical geometry and textural illusion is a mark of a mature digital sculptor.
Why Sculpture in the Metaverse Doesn’t Need a Base or Gravity?
For millennia, sculpture has been a battle against gravity. From the Parthenon Marbles to Rodin’s “The Thinker,” artists have had to consider the physical realities of mass, balance, and support. Every sculpture needed a base, a connection to the ground that acknowledged its weight. The metaverse and VR sculpting environments obliterate this fundamental constraint. When your gallery is a virtual space and your material is light, what happens to the art of sculpture? It becomes untethered. It becomes architecture. It becomes an experience.
In this new paradigm, the concept of a “base” becomes obsolete, or rather, it is redefined. The base is no longer a physical plinth but can be the viewer’s own perspective, or an interactive trigger. As noted in a piece by Parametric Architecture on VR sculpting, a sculpture’s presence can be defined by its interaction with the viewer or its response to the virtual environment. This opens up a universe of creative possibilities that were physically impossible before. Sculptures can float, elements can be suspended in impossible configurations, and the artwork can react, move, and transform around the visitor.
This freedom from gravity allows sculptors to explore new narrative and formal languages. What does it mean to create a sculpture that you can fly through? Or a piece that reorients itself as you move around it, presenting an ever-changing composition? The sculpture can become an explorable environment in itself.
- Design sculptures with negative space as a primary, traversable element.
- Implement floating, kinetic components that interact with each other in physically impossible ways.
- Create works that unfold or transform based on the viewer’s proximity or gaze.
- Build micro-architectural experiences where the viewer enters the sculpture itself.
This is not just sculpture anymore; it’s a form of dynamic, interactive world-building. The challenge for the modern sculptor is to not just create beautiful forms, but to choreograph beautiful experiences in a world without weight.
Key Takeaways
- Structure is paramount: Good topology isn’t a suggestion; it’s the anatomical blueprint that allows your character to live and move believably.
- Light is a tool: Don’t just illuminate your work, carve it with light. Use key, fill, and rim lights to define form, create drama, and guide the viewer’s eye.
- Mastery enables freedom: Understanding the rules of form, structure, and weight is what allows you to break them intentionally, creating stylized art or gravity-defying experiences.
Polygon Aesthetics: Why Low-Poly Art Is a Style Choice, Not Just an Optimization?
For years, the term “low-poly” was synonymous with technical limitation. It was the blocky, simplified look of early video games, a necessary compromise for the hardware of the time. But to dismiss it as such today is to miss a major artistic movement. In the modern context, the low-poly aesthetic is a deliberate, conscious style choice, not a constraint. It is a form of digital minimalism, where the artist intentionally reduces a form to its most essential planes and facets. It’s about finding the beauty in the polygon itself.
This approach has deep roots in 20th-century art. The clean, faceted surfaces and emphasis on underlying structure are not far removed from the principles of early modernism and, most notably, Cubism. A powerful argument can be made that this aesthetic is about more than just simplicity; it is a way of seeing.
The low-poly aesthetic is a direct descendant of Cubism. It’s not about lacking detail, but about intentionally faceting surfaces to reveal underlying structure and show multiple viewpoints simultaneously.
– Digital Art Community
Choosing a low-poly style is a testament to an artist’s understanding of form. To successfully reduce a complex object to a handful of polygons while retaining its character and recognizability requires a profound grasp of silhouette, light, and shadow. Each vertex, each edge, and each face must be placed with absolute intention. There is no room for error or superfluous detail. It is the ultimate expression of “polygonal intent.”
In a world where photorealism is increasingly achievable, choosing an expressive, stylized approach like low-poly is a powerful artistic statement. It declares that the goal is not to mimic reality, but to interpret it. It is a celebration of the digital medium itself, embracing the polygon not as a limitation, but as the fundamental building block of a unique and compelling visual language.
Now that you understand the core principles that transform a simple model into a work of art, the next step is to apply this knowledge. Begin your next project not by opening the software, but by planning the structure, considering the light, and defining the artistic intention behind every polygon you create.